Installation Manual
Environment Prerequisites
Before the installation make sure that the DEV-local environment has properly installed and configure the following pre-requisites (instructions how to install are not provided):
Prerequisite |
Version |
Description |
|---|---|---|
OS |
Linux (tested with Ubuntu 21.04), Mac and Windows supported |
OS of the DEV-local environment |
Python |
3.x (tested 3.7.11) |
Python should be installed in the DEV-local environment; e.g. to execute manage.py |
npm |
7.5.x (tested with 7.5.2) |
Package manager for Javascript, used to install yarn |
yarn |
1.22.x (tested with 1.22.17) |
Package manager for code, recommended to install through npm package manager, which comes bundled with Node.js. Used to deploy the frontend application |
docker |
20.x (tested with 20.17) |
Software platform to create, manage and run applications. Backend applications are containerized. |
docker-compose |
1.29.x (tested with 1.29.2) |
Tool to define and run the multi-container Docker applications. |
Web Browser |
Chrome, Firefox, Safari or Edge latest versions |
Used to access the SPA |
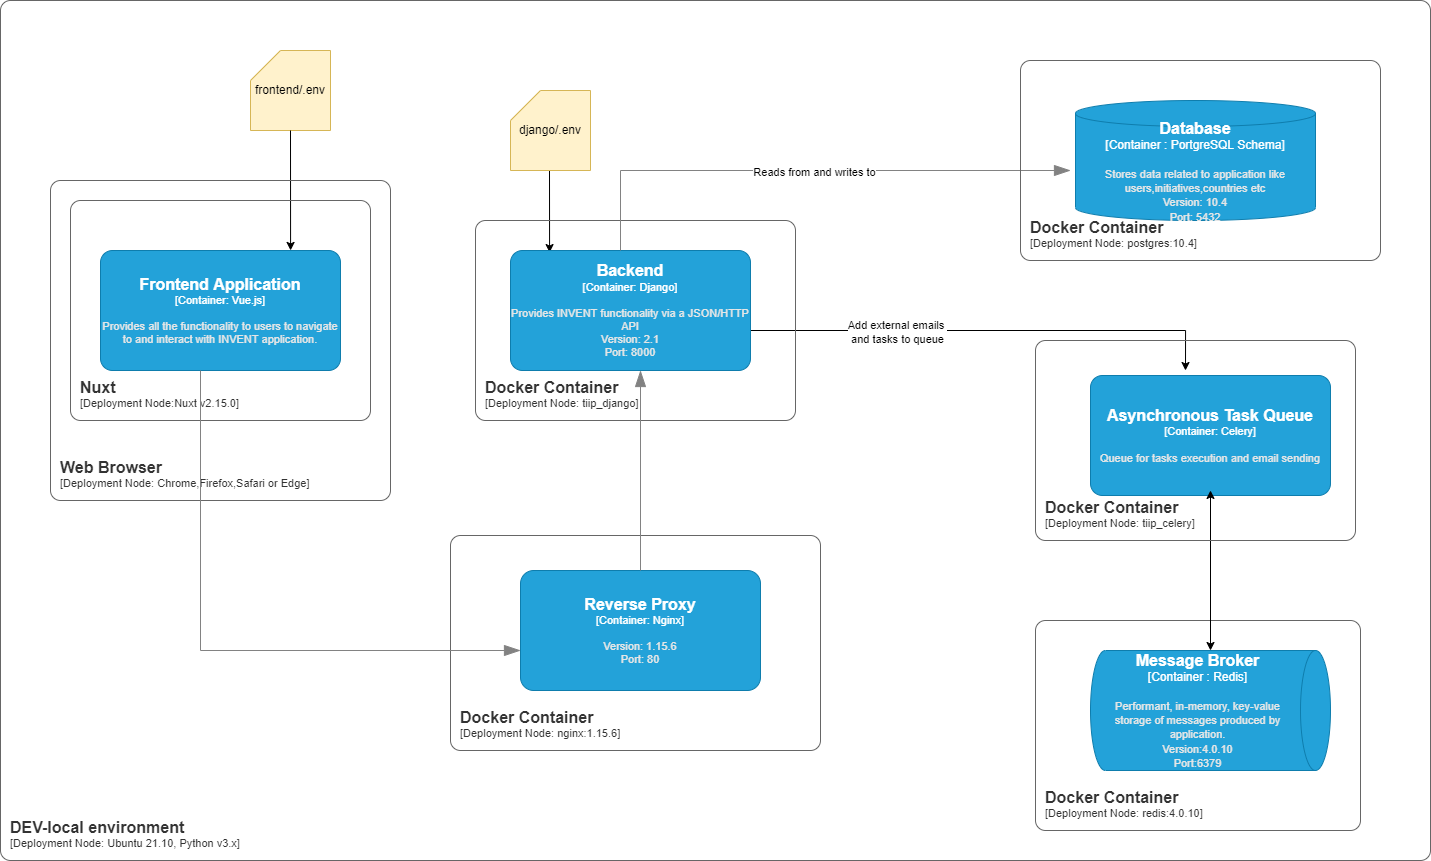
Deployment Diagram
Clone repository
git clone <GIT_REPOSITORY_URL>
cd <GIT_REPOSITORY_NAME>
Configure
Copy <GIT_REPOSITORY_NAME>/django/.env.template to <GIT_REPOSITORY_NAME>/django/.env and provide the appropriate values (required in django/tiip/settings.py):
SECRET_KEY=<a random generated long alphabetic string eg dskgsjgssosdsfhaplfnfbkjnndbff>
DEBUG=False
AZURE_CLIENT_ID=
AZURE_SECRET=
AZURE_TENANT=
AZURE_CALLBACK_URL=
Where:
Key |
Optional/Mandatory |
Description |
|---|---|---|
|
Mandatory |
A secret key for a particular Django installation. It provides cryptographic signing and it should be set to a unique, unpredictable value. |
|
Mandatory |
A boolean that turns on/off debug mode |
|
Optional |
The client(application) ID of an App Registration in the tenant. |
|
Optional |
A client secret that was generated for the App Registration. |
|
Optional |
The Azure Active Directory tenant(directory) ID. |
|
Ooptional |
Azure login redirect URI |
Copy <GIT_REPOSITORY_NAME>/frontend/.env.template to <GIT_REPOSITORY_NAME>/frontend/.env and provide the appropriate values:
HOST=localhost
PORT=3000
AZURE_CLIENT_ID=
AZURE_REDIRECT_URI=
AZURE_TENANT=
Where:
Key |
Optional/Mandatory |
Description |
|---|---|---|
|
Mandatory |
The host url for frontend. |
|
Mandatory |
The port that frontend is loaded. |
|
Optional |
The client(application) ID of an App Registration in the tenant. |
|
Optional |
The redirect_uri of the application, where authentication responses can be sent and received. |
|
Optional |
The Azure Active Directory tenant(directory) ID. |
Configure database connection in django/tiip/settings.py:
here:
Location |
Description |
Example |
|---|---|---|
|
Schema name |
postgres |
|
Username |
postgres |
|
Hostname |
localhost |
|
Port |
5432 |
Warning
This configuration assumes that PostgreSQL trusts connections from localhost else a password is required.
Configure emails:
Location |
Description |
Example |
|---|---|---|
|
Used in |
UNICEF T4D & Innovation Inventory Portal mailto:noreply@invent.unicef.org |
Build
Change directory to the project’s root folder.
cd <GIT_REPOSITORY_NAME>
Build containers:
docker-compose build
This command will use the default docker-compose.yml file
Important
Code changes are applied immediately in backend without the need to restart django.
Tests Execution
Change directory to the project’s root folder.
cd <GIT_REPOSITORY_NAME>
In order to execute all the tests, execute the following:
docker-compose exec django py.test --cov --cov-report html --cov-fail-under 100 --cov-report term-missing --cov-config. Coveragerc
Alternatively, in order to execute a test suite for a specific Django application (see section 3.3.1.1) execute the following:
docker-compose exec django ptw – <DJANGO_APPLICATION> -s –testmon
For example for django/project/tests:
docker-compose exec django ptw -- project -s –testmon
For example, for django/core/tests.py:
docker-compose exec django ptw -- core -s –testmon
There is also the option to run a single test from the application’s test suite by executing the following:
docker-compose exec django py.test -s -k <DJANGO_APPLICATION_TEST>
For example, for django/user/tests:
docker-compose exec django py.test -s -k test_non_expiring_api_token_auth
Deploy backend
Start containers
Change directory to the project’s root folder.
cd <GIT_REPOSITORY_NAME>
Start containers:
docker-compose up
This will load configuration from the file docker-compose.yml and load the following containers:
Image |
Description |
|---|---|
nginx:1.15.6 |
Downloads docker image of nginx from Docker Hub and creates tiip_nginx container |
postgres:10.4 |
Downloads docker image of postgres from Docker Hub and creates tiip_postgres container. Set environment for postgresql environment: {POSTGRESQL_DB=postgres, POSTGRESQL_USER=postgres, POSTRESQL_PASSWORD= postgres} |
redis:4.0.10 |
Downloads docker image of Redis from Docker Hub and creates tiip_redis container |
django |
Creates tiip_django container and starts the django application with the command |
redis |
Creates tiip_celery container and starts celery with the command |
Create DB
Change directory to the project’s root folder.
cd <GIT_REPOSITORY_NAME>
Execute the following command to create the DB schema:
docker-compose exec django python manage.py migrate --noinput
Deploy frontend
Change directory to the project’s root folder.
cd <GIT_REPOSITORY_NAME>/frontend
Execute the following to add the dependencies from frontend/package.json file and create node_modules folder:
yarn install
Execute the following to start the frontend server:
yarn dev
Create superuser (at least one is required)
Change directory to the project’s root folder.
cd <GIT_REPOSITORY_NAME>
Execute the following to create a superuser:
docker-compose exec django python manage.py createsuperuser
Provide the required information, username, email and password.
A superuser can create more superusers as described in {ref}(administration_manual).
Validate successful installation
Login as superuser
Visit with the browser the URL http://localhost/admin and login:
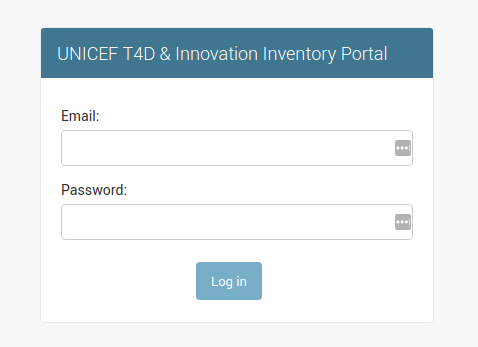
Superuser Login Screen
After a successful login the admin page is loaded:
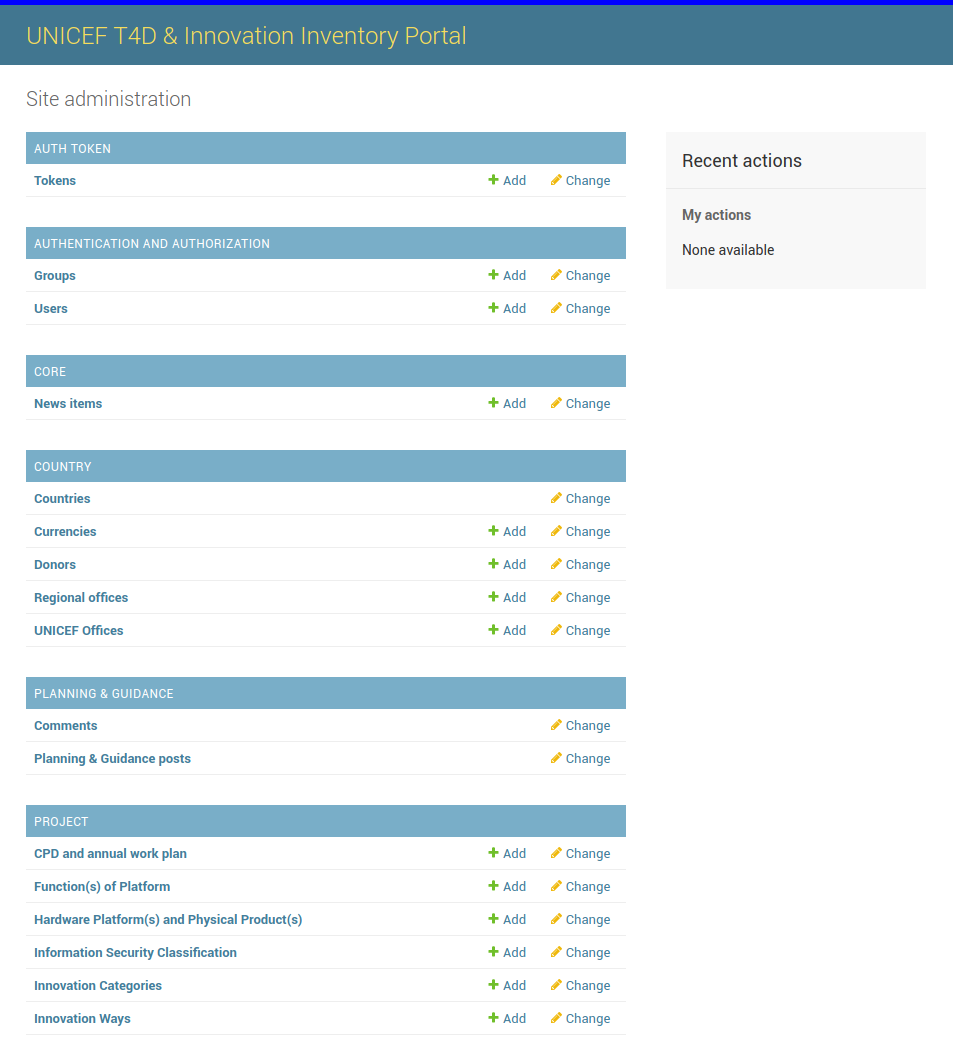
Superuser Homepage Screen
Login as user (local authentication)
Navigate to http://localhost:3000/en/-/login and enter the user’s credentials to login:
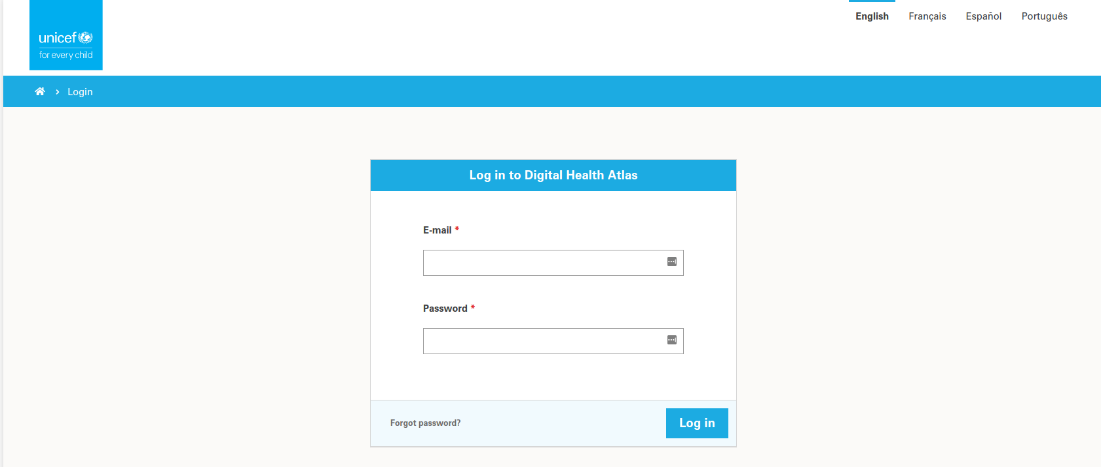
User Login Screen
After a successful login the user is redirected to INVENTORY dashboard by clicking on “unicef” icon on the top left corner the home page is loaded.
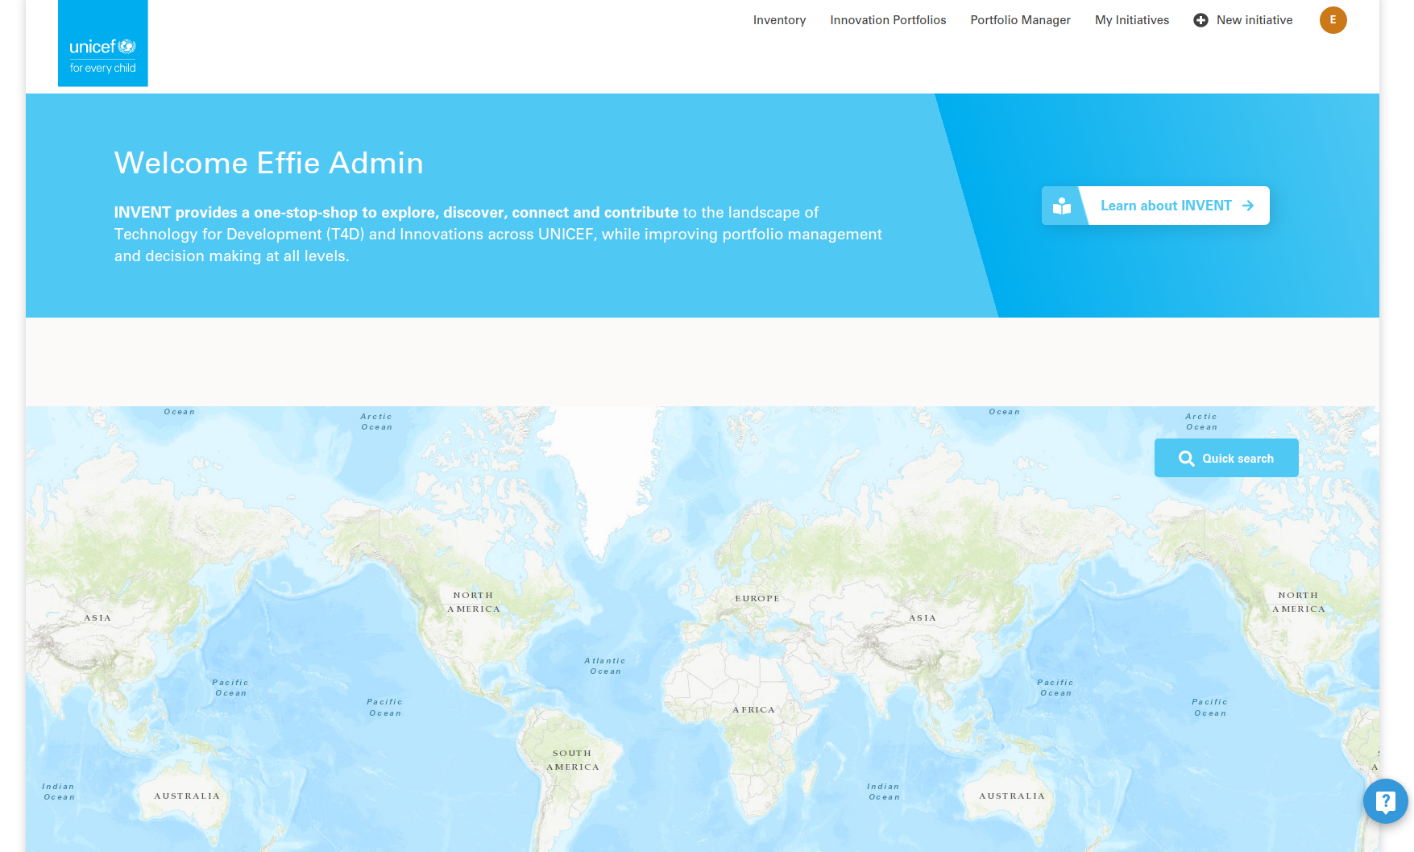
UserHomepage Screen
Login as user (Azure Single Sign-On)
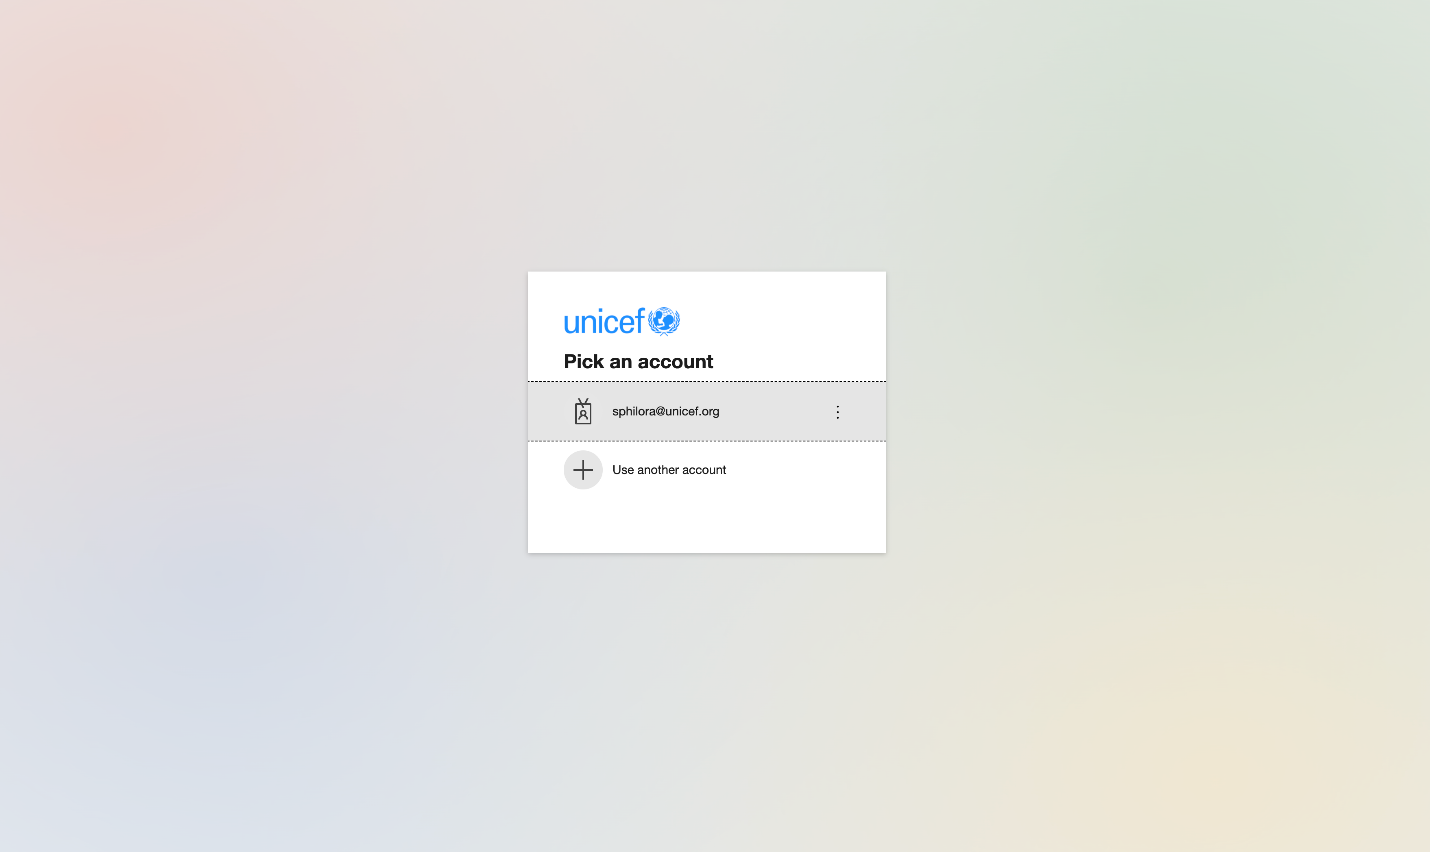
Superuser Login Screen

Superuser Login Screen 2